


Welcome to our comprehensive tutorial on building high-performance trading tools with C++. If you’ve ever looked at institutional trading systems and wondered, "How do I get that kind of speed?" the answer is almost always the FIX Protocol. Unlike standard web APIs (REST), FIX is the raw language of financial markets—designed for speed, reliability, and continuous data streams.
Getting Started
In this guide, we are going to build a professional-grade market data client connected to TraderMade. The best part? We are going to standardize the process. Whether you are on a native Linux machine or a Windows laptop, we will use WSL (Windows Subsystem for Linux) to ensure the code runs identically everywhere.
This guide supports two setups:
- Windows Users: Follow every step (installing WSL).
- Linux Users: Skip Step 1 and use the "Linux" commands where indicated.
1. Install WSL (Windows Only)
Goal: Get a Linux environment running on your Windows machine.
Linux Users: SKIP this step. You are already running Linux! Go to Step 2.
Open PowerShell as Administrator (Right-click Start button → "Windows PowerShell (Admin)"). Run this command to install WSL and Ubuntu:
wsl --install
Restart your computer if asked. After restarting, open Ubuntu (search for "Ubuntu" in the Start menu). Create a Username and Password when asked.
- Note: When typing the password, the screen will stay blank. This is normal security. Just type it and press Enter.
2. Install Linux Tools
Goal: Install the C++ compiler and the QuickFIX library.
Note: This command works for both WSL (Ubuntu) and Native Linux (Ubuntu/Debian).
In your terminal, paste this command to install all necessary tools at once also enter your password if prompted:
sudo apt-get update && sudo apt-get install build-essential cmake libquickfix-dev pkg-config -y
3. Get Your TraderMade Configuration
Goal: Download the connection settings for your specific account.
First of all, log in to your TraderMade Dashboard.
On the right side, look for the FIX Configuration button (as seen in the screenshot highlighted with red box).
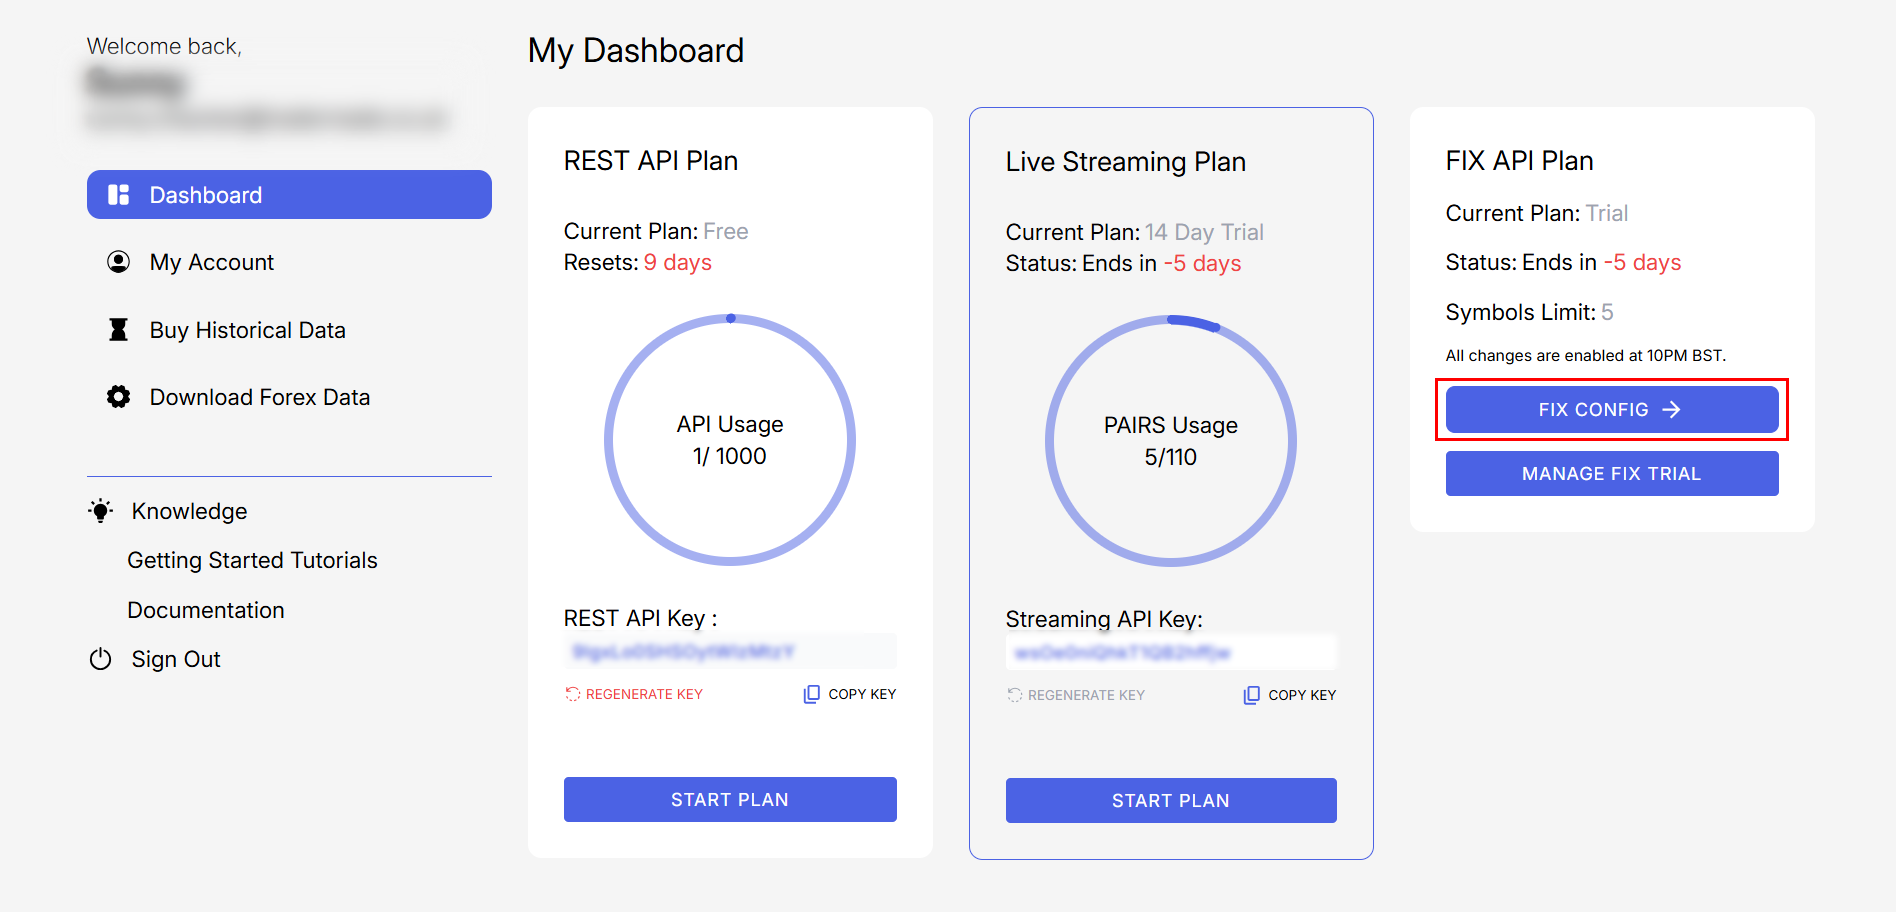
Click it to download a file named fix_config.cfg (or similar). We will move it in Step 4.
4. Create Project & Download Dictionary
Goal: Set up the folder structure exactly how the config expects it.
Create the main folder for windows: You can create FIXCLIENT folder manually or run this command in your terminal to create a folder on your Windows Desktop:
mkdir -p /mnt/c/Users/$(whoami)/Desktop/FIXCLIENT
Create the main folder for Linux: You can create FIXCLIENT folder manually or run this command in Ubuntu to create a folder:
mkdir -p ~/Desktop/FIXCLIENT
Note:Steps are now same for both linux and windows user.
Copy the fix_config.cfg file that you downloaded in Step 3 and paste it into the FIXCLIENT folder on your desktop.
Now go inside your FIXCLIENT folder and there make a folder named spec. Now Download the Dictionary using the command below:
wget https://raw.githubusercontent.com/quickfix/quickfix/master/spec/FIX44.xml -O spec/FIX44.xml
5. Update Configuration
Now it's time to update the configuration file.
Open the config file: named fix_config.cfg.
Update the file: Replace the contents of your fix_config.cfg with the code below.
⚠️ IMPORTANT: You must keep your own Username, Password, and SenderCompID from the original file!
[DEFAULT]
ApplicationID=FixClientApp
ConnectionType=initiator
ReconnectInterval=5
FileStorePath=store/
FileLogPath=log/
StartTime=00:00:00
EndTime=23:59:59
HeartBtInt=30
UseDataDictionary=Y
DataDictionary=../spec/FIX44.xml
Symbols=GBPUSD
# REUSE YOUR DETAILS BELOW:
Username=YOUR_USERNAME_HERE
Password=YOUR_PASSWORD_HERE

[SESSION]
ResetOnLogon=Y
BeginString=FIX.4.4
SocketConnectPort=5000
SocketConnectHost=marketdata.tradermade.com
TargetCompID=TRADERMADE_M1
# REUSE YOUR SENDER ID BELOW:
SenderCompID=YOUR_SENDER_ID_HERE

[LOGGING]
LogFilePath=log/fix-client.log
LogLevel=INFO
6. Add Your Source Code and Build Script
Now we need two files to compile and run the code: the C++ source code (main.cpp) and the build script (CMakeLists.txt).
Get the Source Code: Download main.cpp from our GitHub Repository and place it inside your FIXCLIENT folder.
Create the Build Script: Create a CMakeLists.txt file in your project root.Then, paste the following code into CMakeLists exactly as it is:
cmake_minimum_required(VERSION 3.10)
project(FixClient)

# CHANGED: Use C++14 to support the installed QuickFIX version
set(CMAKE_CXX_STANDARD 14)

# Find QuickFIX
find_package(PkgConfig REQUIRED)
pkg_check_modules(QUICKFIX REQUIRED quickfix)

add_executable(FixClient main.cpp)

# Link libraries
if(QUICKFIX_FOUND)
    target_link_libraries(FixClient ${QUICKFIX_LIBRARIES} pthread)
    target_include_directories(FixClient PUBLIC ${QUICKFIX_INCLUDE_DIRS})
else()
    target_link_libraries(FixClient quickfix pthread)
endif()
Verify Your Setup: Before moving to final step to build, make sure your folder structure looks exactly like this:
FIXCLIENT/
├── build/                 # (Created in the next step)
├── spec/
│   └── FIX44.xml          # The dictionary downloaded in Step 4
├── CMakeLists.txt         # The build script created in Step 6
├── fix_config.cfg         # Your config file
└── main.cpp               # The C++ source code
7. Build and Run
Goal: Compile the code and connect to TraderMade.
To compile your code you should create a folder named build and then run these commands:
cd build
cmake ..
make
Now while being inside the build folder, to start printing market data, you should Run the code using the commands below:
./FixClient ../fix_config.cfg
Expected Success: You should see the client log on and start printing market data:
Logon: FIX.4.4:TMCI_...->TRADERMADE_M1
W: GBPUSD entries=10 :: BID=1.3668 | BID=1.36679 | BID=1.36678 | BID=1.36676 | BID=1.36675 | ASK=1.36689 | ASK=1.3669 | ASK=1.36692 | ASK=1.36693 | ASK=1.36694
W: GBPUSD entries=10 :: BID=1.36686 | BID=1.36685 | BID=1.36684 | BID=1.36682 | BID=1.36681 | ASK=1.36694 | ASK=1.36695 | ASK=1.36696 | ASK=1.36697 | ASK=1.36699
W: GBPUSD entries=10 :: BID=1.36686 | BID=1.36685 | BID=1.36684 | BID=1.36682 | BID=1.36681 | ASK=1.36695 | ASK=1.36696 | ASK=1.36697 | ASK=1.36699 | ASK=1.367
W: GBPUSD entries=10 :: BID=1.36686 | BID=1.36685 | BID=1.36684 | BID=1.36682 | BID=1.36681 | ASK=1.36695 | ASK=1.36696 | ASK=1.36697 | ASK=1.36699 | ASK=1.367
W: GBPUSD entries=10 :: BID=1.36686 | BID=1.36685 | BID=1.36684 | BID=1.36682 | BID=1.36681 | ASK=1.36694 | ASK=1.36695 | ASK=1.36696 | ASK=1.36697 | ASK=1.36699
W: GBPUSD entries=10 :: BID=1.36686 | BID=1.36685 | BID=1.36683 | BID=1.36682 | BID=1.36681 | ASK=1.36694 | ASK=1.36695 | ASK=1.36696 | ASK=1.36697 | ASK=1.36699
W: GBPUSD entries=10 :: BID=1.36687 | BID=1.36686 | BID=1.36685 | BID=1.36683 | BID=1.36682 | ASK=1.36695 | ASK=1.36696 | ASK=1.36697 | ASK=1.36699 | ASK=1.36701
Conclusion
You have now successfully established a professional-grade FIX trading environment capable of running on both Windows (via WSL) and native Linux. By configuring QuickFIX with C++, you have unlocked a low-latency gateway to institutional financial markets, bypassing the limitations of standard REST APIs.
This setup serves as a powerful foundation. Whether you are capturing high-frequency market data, implementing complex execution algorithms, or processing Level 2 price depth, you now possess the infrastructure to handle real-time financial data with precision and speed.
Resources
- GitHub Repository: Get full code and examples
- FIX Documentation: Official TraderMade FIX Specs
- Get Your Key: Sign up for an API Key